很早之间就想学学传说中的cs61a/b/c了,这里花两三天时间过一遍cs61c(2020).
整个课程做起来最大的问题是,过去的课程目前不开放给校外人员了,现有的资料没有保存图片,所以lab没有图片..
Labs
00
学习常用指令,我个人常用(由于我目前使用windows,许多指令都没有)find,grep,ps,kill等指令1
2ps aux | grep "xxx"
find ./ -type f -exec grep "xx" {} +
现在Linux上有许多重写的更好用的工具,比如ripgrep,btop等等
01
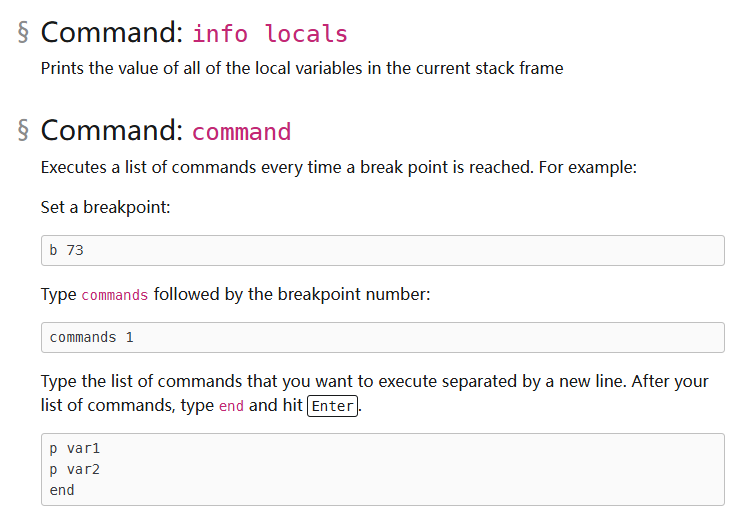
使用gdb和valgrind1
2
3
4
5
6
7
8gcc -g -o hello hello.c
gdb hello
b # set breakpoint
bt # backtrace
p expr # display value
c # continue running
n # next line,stepping over function calls
s # next line,stepping into function calls
详情查看manualgdb5-refcard-89fdebb2475f348ded03071dd13271df.pdf (learncs.site)
运行时内存错误可以使用valgrind. Valgrind是一个程序,模拟你的CPU和跟踪你的内存访问
此外写一个检查链表是否有循环的c代码1
2
3
4
5
6
7
8
9
10
11
12
13
14
15
16
17
18
19
20
21
22
int ll_has_cycle(node *head) {
/* your code here */
if (head == NULL || head->next == NULL) {
return 0;
}
node *tortoise = head;
node *hare = tortoise->next->next;
while (hare != NULL) {
tortoise = tortoise->next;
if (hare == tortoise) {
return 1;
}
if (hare->next == NULL) {
return 0;
}
hare = hare->next->next;
}
return 0;
}
02
学习使用Makefile(虽然我现在基本使用CMake或者直接用visual studio(当然vs仙子啊也支持了cmake))
makefile是代码目录中的一个文本文件(字面上标记为“makefile”),其中包含一组规则,每个规则都有为其编译C程序的命令。每个makefile可以包含多个规则,每个规则编译一个或多个目标(例如可执行文件)或执行不同的目标。要编译一个目标,程序员只需要在他们的命令终端输入“make
使用位操作分别获取,设置,翻转一个值的某位.1
2
3
4
5
6
7
8
9
10
11
12
13
14
15
16
17
18
19
20
21
22
23
24
25
26unsigned get_bit(unsigned x, unsigned n) {
// YOUR CODE HERE
// Returning -1 is a placeholder (it makes
// no sense, because get_bit only returns
// 0 or 1)
int mask = 1 << n; // e.g. n = 5, 000100000
return (x & mask) >> n;
}
// Set the nth bit of the value of x to v.
// Assume 0 <= n <= 31, and v is 0 or 1
void set_bit(unsigned *x, unsigned n, unsigned v) {
// YOUR CODE HERE
int mask = 1 << n;
if (v == 1) {
*x = *x | mask;
} else {
*x = *x & ~mask;
}
}
// Flip the nth bit of the value of x.
// Assume 0 <= n <= 31
void flip_bit(unsigned *x, unsigned n) {
// YOUR CODE HERE
int mask = 1 << n;
*x = *x ^ mask;
}
实现线性反馈移位寄存器1
2
3
4
5
6
7
8
9
10
11void lfsr_calculate(uint16_t *reg) {
/* YOUR CODE HERE */
int bit0 = *reg & 1;
int bit2 = (*reg >> 2) & 1;
int bit3 = (*reg >> 3) & 1;
int bit5 = (*reg >> 5) & 1;
int new_bit = bit0 ^ bit2 ^ bit3 ^ bit5;
*reg = *reg >> 1;
int mask = new_bit << 15;
*reg = *reg | mask;
}
然后实现一个动态长度array,其实就是利用malloc,free分配内存,这些内存往往在堆上.1
2
3
4
5typedef struct {
usize capacity;
uszie size;
int* data;
} DArray;
初始化和free时主要需要分别malloc整个结构和存储的data数据,1
2
3
4
5
6
7
8
9
10
11
12
13
14
15
16
17
18
19
20
21
22
23
24
25
26
27
28
29
30vector_t *vector_new() {
/* Declare what this function will return */
vector_t *retval;
/* First, we need to allocate memory on the heap for the struct */
retval = (vector_t *)malloc(sizeof(vector_t)); /* YOUR CODE HERE */
/* Check our return value to make sure we got memory */
if (retval == NULL) {
allocation_failed();
}
/* Now we need to initialize our data.
Since retval->data should be able to dynamically grow,
what do you need to do? */
retval->size = 1 /* YOUR CODE HERE */;
retval->data = (int *)malloc(retval->size * sizeof(int)) /* YOUR CODE HERE */;
/* Check the data attribute of our vector to make sure we got memory */
if (retval->data == NULL) {
free(retval); // Why is this line necessary?
allocation_failed();
}
/* Complete the initialization by setting the single component to zero */
retval->data[0] = 0;
/* and return... */
return retval;
}
03
RISCV汇编,
.data段落包含初始化的全局和静态变量, .word段用于分配和初始化内存(通常4字节)
.text段落包括程序的可执行指令,x0寄存器中值始终为01
2
3
4
5
6
7
8
9
10
11
12
13
14
15
16
17.text
main:
add t0, x0, x0 # curr_fib = 0
addi t1, x0, 1 # next_fib = 1
la t3, n # load the address of the label n
lw t3, 0(t3) # get the value that is stored at the adddress denoted by the label n
fib:
beq t3, x0, finish # exit loop once we have completed n iterations
add t2, t1, t0 # new_fib = curr_fib + next_fib;
mv t0, t1 # curr_fib = next_fib;
mv t1, t2 # next_fib = new_fib;
addi t3, t3, -1 # decrement counter
j fib # loop
finish:
addi a0, x0, 1 # argument to ecall to execute print integer
addi a1, t0, 0 # argument to ecall, the value to be printed
ecall # print integer ecall
ecall是系统调用,要传递参数,需要将其放入参数寄存器(a0-a7)。当函数执行时,它将在这些寄存器中查找参数。第一个参数应该放在a0中,第二个参数应该放在a1中,以此类推。1
2
3
4
5
6
7
8
9
10
11
12
13
14
15
16int source[] = {3, 1, 4, 1, 5, 9, 0};
int dest[10];
int fun(int x) {
return -x * (x + 1);
}
int main() {
int k;
int sum = 0;
for (k = 0; source[k] != 0; k++) {
dest[k] = fun(source[k]);
sum += dest[k];
}
return sum;
}
上面c代码转为汇编,全局变量使用.data和.word分配,只写t和a寄存器(临时寄存器和参数寄存器),s寄存器在调用函数前注意保存
li指令:将立即数加载到寄存器中。la指令:加载变量的地址到寄存器中。lw指令:从内存中加载一个 32 位字到寄存器中。sw指令:将寄存器中的 32 位字存储到内存中。sw指令:将寄存器中的 32 位字存储到内存中。sh指令:将寄存器中的 16 位半字存储到内存中。sb指令:将寄存器中的 8 位字节存储到内存中内存地址主要就是寄存器offset寻址
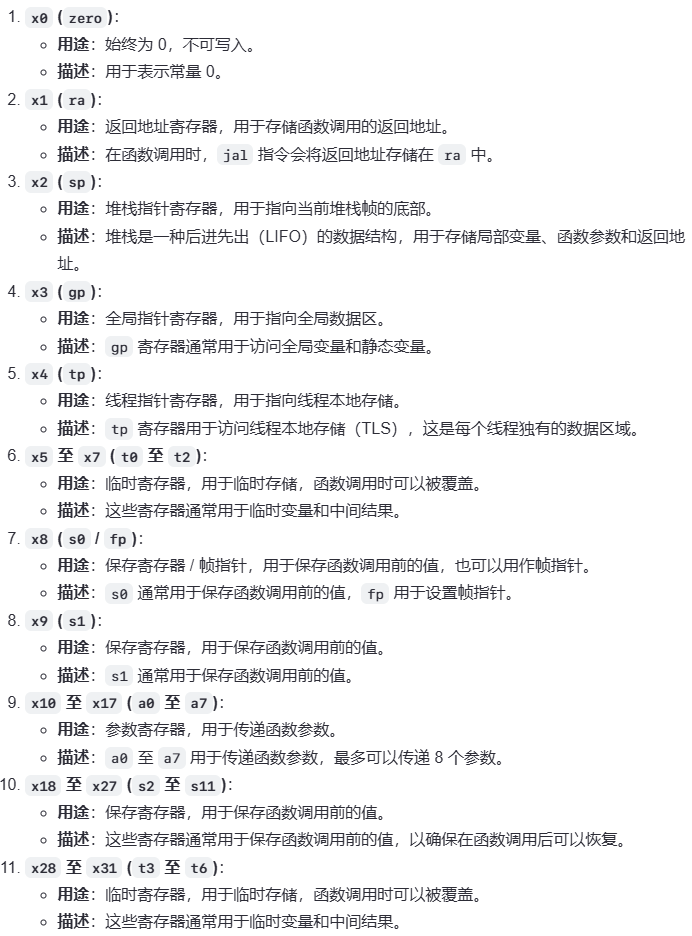
RISC-V 调用约定
RISC-V 的调用约定规定了哪些寄存器在函数调用时需要保存,哪些寄存器可以被修改。以下是一些主要的约定:
- 临时寄存器(Temporary Registers):
t0至t6:这些寄存器可以在函数调用时被修改,调用者不需要保存这些寄存器的值。a0至a7:这些寄存器用于传递函数参数,也可以在函数调用时被修改,调用者不需要保存这些寄存器的值。
- 保存寄存器(Saved Registers):
s0至s11:这些寄存器在函数调用时需要保存,被调用者必须在返回前恢复这些寄存器的值。ra:返回地址寄存器,被调用者必须在返回前恢复ra的值。
保存和恢复寄存器
为了确保函数调用的正确性,通常需要在函数入口处保存这些寄存器的值,并在函数返回前恢复这些值。这通常通过使用堆栈来实现(利用sp栈寄存器). 通常内存上的值首先加到寄存器上然后再进行计算.1
2
3
4
5
6
7.data
n: .word 8
lw t0, 0(sp) ; t0 = [sp]
la t1, n
lw t1, 0(t1) ; t1 = [t1]
addi t1,t1,2
sw t0, 0(t1) ; [t1] = t0
使用RISCV写一段factorial代码,注意要么写为recursion要么写更简单的iteration1
factorial(n) = n!
1
2
3
4
5
6
7
8
9
10
11
12
13
14
15factorial:
addi sp,sp,-4
sw s0,0(sp) # sp[0] = s0
addi s0,x0,1 # sum = 1
addi t0,x0,1 # i = 1
loop:
blt a0,t0,exit # if n < i, goto exit
mul s0,s0,t0# sum = sum * i
addi t0,t0,1 # i++
jal x0,loop
exit:
add a0,x0,s0 # a0 = sum
lw s0,0(sp) # s0 = sp[0]
addi sp,sp,4
jr ra
所有覆盖按约定保留的寄存器的函数都必须有一个序言(prologue)和一个尾声(epilogue),序言将这些寄存器值保存到函数开始时的堆栈中;epilogue将为函数的调用者恢复这些值。 由于调用约定违反而导致的bug很难发现,不要直接修改这些寄存器
也就是对于保存寄存器的处理,包括s开头的寄存器和ra寄存器(受jal影响)
后面有一个专门的测试,在每个函数前后写上将s寄存器值保存到内存的代码,此外如果一个函数栈中调用了另一个函数,如果那个函数修改了t寄存器,那么父函数栈也需要保存相应的寄存器. 对于ra寄存器同理,函数jrl调用另一个函数,修改了ra寄存器值,也需要在调用另一个函数之前保存ra,否则这个函数无法通过jr跳转回去了(当然可以使用j label调转到某个位置).
此外还使用RISC-V实现了链表分配和map操作.1
2
3
4
5
6
7
8
9
10
11
12
13
14
15
16
17
18
19
20
21
22
23
24
25
26create_default_list:
addi sp, sp, -12
sw ra, 0(sp)
sw s0, 4(sp)
sw s1, 8(sp)
li s0, 0 # pointer to the last node we handled
li s1, 0 # number of nodes handled
loop: #do...
li a0, 8
jal ra, malloc # get memory for the next node
sw s1, 0(a0) # node->value = i
sw s0, 4(a0) # node->next = last
add s0, a0, x0 # last = node
addi s1, s1, 1 # i++
addi t0, x0, 10
bne s1, t0, loop # ... while i!= 10
lw ra, 0(sp)
lw s0, 4(sp)
lw s1, 8(sp)
addi sp, sp, 12
jr ra
malloc:
addi a1, a0, 0
addi a0, x0 9
ecall
jr r
上面malloc中调用了ecall系统调用.
实现高阶函数map操作1
2
3
4
5
6
7
8
9
10
11
12
13
14
15
16
17
18
19
20
21
22
23
24
25
26
27
28
29
30
31
32
33
34
35
36
37
38
39
40
41
42
43
44
45
46
47
48
49
50
51
52
53
54
55
56
57map:
# Prologue: Make space on the stack and back-up registers
### YOUR CODE HERE ###
addi sp,sp,-12
sw ra, 0(sp)
sw s0, 4(sp)
sw s1, 8(sp)
beq a0, x0, done # If we were given a null pointer (address 0), we're done.
add s0, a0, x0 # Save address of this node in s0
add s1, a1, x0 # Save address of function in s1
# Remember that each node is 8 bytes long: 4 for the value followed by 4 for the pointer to next.
# What does this tell you about how you access the value and how you access the pointer to next?
# load the value of the current node into a0
# THINK: why a0? prepare to call map
### YOUR CODE HERE ###
lw a0,0(s0) # a0 = [s0]
# Call the function in question on that value. DO NOT use a label (be prepared to answer why).
# What function? Recall the parameters of "map"
### YOUR CODE HERE ###
# jal is used to jump to label
jalr ra, s1 ,0 # call square
# Where can you assume the returned value is?
### YOUR CODE HERE ###
sw a0, 0(s0) # [s0] = a0
# Load the address of the next node into a0
# The Address of the next node is an attribute of the current node.
# Think about how structs are organized in memory.
### YOUR CODE HERE ###
lw a0, 4(s0) # a0 = [s0+4]
# Put the address of the function back into a1 to prepare for the recursion
# THINK: why a1? What about a0?
### YOUR CODE HERE ###
mv a1, s1 # not really necessary, cause a1 is not changed in square functino
# recurse
### YOUR CODE HERE ###
jal ra, map
done:
# Epilogue: Restore register values and free space from the stack
### YOUR CODE HERE ###
lw ra, 0(sp)
lw s0, 4(sp)
lw s1, 8(sp)
addi sp,sp,12
jr ra # Return to caller
square:
mul a0 ,a0, a0
jr ra
04
修改一个汇编代码中的问题,我卡了很久还是看了其他人的解答.
在main中获取数组第一个值地址和大小,在mainLoop中不断遍历,修改数组值1
2
3
4
5
6
7
8
9
10
11
12
13
14
15
16
17
18
19
20
21
22
23
24
25
26
27
28
29
30
31
32
33
34
35
36
37
38
39
40
41
42
43
44
45
46
47
48
49
50
51
52map:
addi sp, sp, -12
sw ra, 0(sp)
sw s1, 4(sp)
sw s0, 8(sp)
beq a0, x0, done # if we were given a null pointer, we're done.
add s0, a0, x0 # save address of this node in s0
add s1, a1, x0 # save address of function in s1
add t0, x0, x0 # t0 is a counter
lw t1, 0(s0) # load the address of the array of current node into t1
lw t2, 4(s0) # load the size of the node's array into t2
addi t1, t1, -4
# remember that each node is 12 bytes long:
# - 4 for the array pointer
# - 4 for the size of the array
# - 4 more for the pointer to the next node
# also keep in mind that we should not make ANY assumption on which registers
# are modified by the callees, even when we know the content inside the functions
# we call. this is to enforce the abstraction barrier of calling convention.
mapLoop:
# add t1, s0, x0 # load the address of the array of current node into t1
addi t1, t1, 4 # offset the array address by the count
lw a0, 0(t1) # load the value at that address into a0
addi sp,sp,-12
sw t0, 0(sp)
sw t1, 4(sp)
sw t2, 8(sp)
jalr ra,s1,0 # call the function on that value.
lw t0, 0(sp)
lw t1, 4(sp)
lw t2, 8(sp)
addi sp,sp,12
sw a0, 0(t1) # store the returned value back into the array
addi t0, t0, 1 # increment the count
bne t0, t2, mapLoop # repeat if we haven't reached the array size yet
lw a0, 8(s0) # load the address of the next node into a0
mv a1,s1
jal map # recurse
done:
lw s0, 8(sp)
lw s1, 4(sp)
lw ra, 0(sp)
addi sp, sp, 12
jr ra
然后写一个映射1
2
3
4
5
6
7f(-3) = 6
f(-2) = 61
f(-1) = 17
f(0) = -38
f(1) = 19
f(2) = 42
f(3) = 5
其中a0寄存器是输入值,a1是输出列表1
2
3
4
5
6
7
8
9
10f:
addi a0,a0,3
# li t0, 4
# mul a0,a0,t0
# add s0,a1,a0 # s0 is the address
slli a0,a0,2
add a0,a1,a0
lw a0, 0(a0)
jr ra
05
使用logisim工具构建模拟电路,使用AND,OR,NOT基本件构建NAND,NOR,XOR以及Mux. 此外还有个寄存器
FSM代表有限状态机。FSM跟踪给定的输入,根据这些输入在状态之间移动,并在每次输入时输出一些东西。
我们使用寄存器来存储当前所在FSM的状态,并使用组合逻辑将FSM的输入和当前寄存器状态映射到FSM的输出和下一个寄存器状态。说实话,这个FSM的作用我没太看懂,貌似是连续两次一样的输入,输出就固定了. 需要连现在状态到下一次状态的电路线,我按照truth table直接推的.
此外还需要画出rotr电路,我一开始画成下面这样,使用Mux-16针对每个0-15值选择对应偏移…
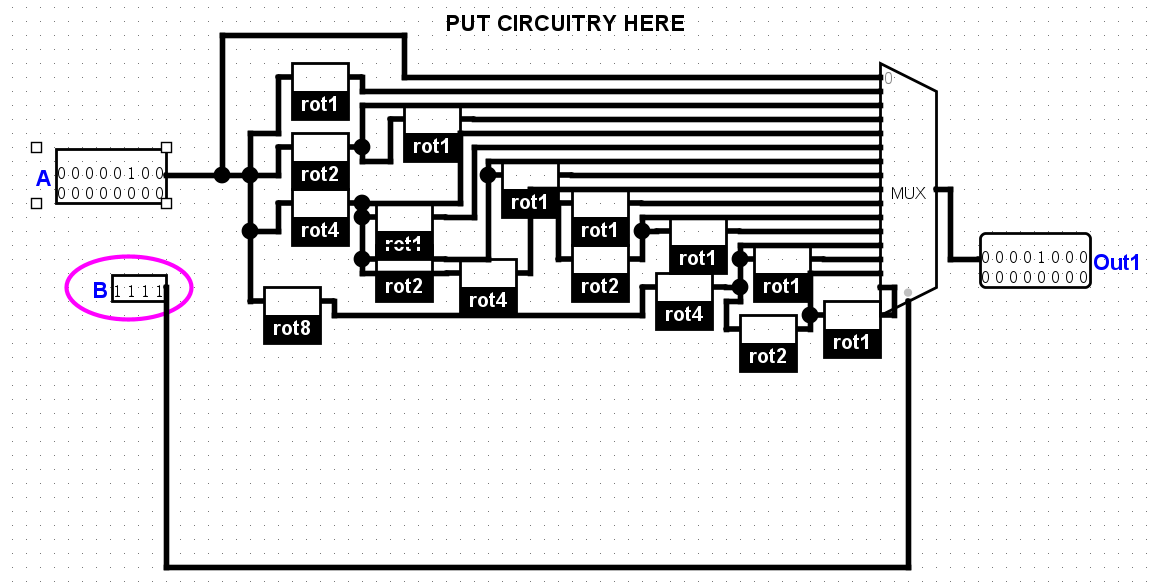
其实可以根据每一位使用mux-2,简单得多

06
关于电路流水线时间的问题,通过编排优化流水线
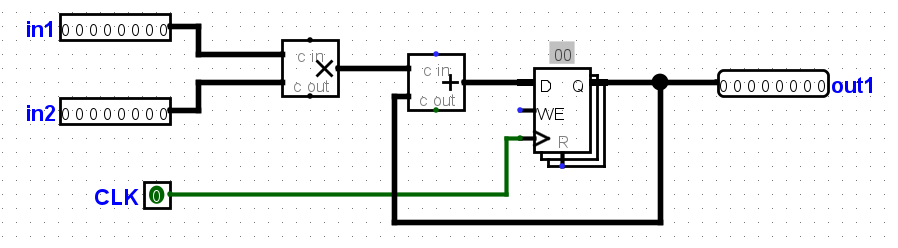
这个电路所做的就是接收两个输入,将它们相乘,然后将结果与当前状态值相加。对于这个电路,设加法器块的传播延迟为45ns,乘法块的传播延迟为60ns。寄存器的CLK-to-Q延迟为10ns,设置时间为10ns,保持时间为5ns。计算该电路可以工作的最大时钟速率。假设两个输入都来自从外部源接收数据的时钟寄存器。
为了确保电路能够正确工作,时钟周期必须满足以下条件:
- 数据路径延迟 + CLK-to-Q 延迟 + 建立时间 ≤ 时钟周期
- 保持时间 < 时钟周期
首先,计算第一个条件: 时钟周期≥数据路径延迟+CLK-to-Q 延迟+建立时间时钟周期≥数据路径延迟+CLK-to-Q 延迟+建立时间 时钟周期≥105 ns+10 ns+10 ns时钟周期≥105ns+10ns+10ns 时钟周期≥125 ns时钟周期≥125ns
接下来,检查保持时间的要求: 时钟周期>5 ns时钟周期>5ns
显然,125ns 已经大于 5ns,所以保持时间的要求自然满足。
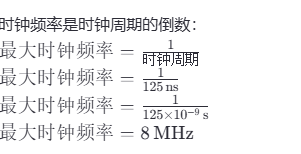
如果一个计算依赖于前一个计算的输出,那么很难对它们进行管道处理,我们通常需要插入一个(或几个)管道“bubbles”,以确保第一个计算的输出准备好成为第二个计算的输入。提醒一下,bubbles是在管道中故意延迟指令的过程。理解为什么这种“bubbles”对于这种特殊的电路是不必要的是很重要的。
下面这种pipeline方案在乘法和加法之间增加了一个register保存中间值,输出会增加一个前导0
在non_pipeline版本中,一个tick会同时更新输出值和寄存器的值
假设我们在乘法器和加法器之间插入一个寄存器,将电路分成两个阶段:
- 第一阶段:乘法器
- 第二阶段:加法器
每个阶段的延迟如下:
- 第一阶段(乘法器)延迟:60ns
- 第二阶段(加法器)延迟:45ns
寄存器的时序要求
- CLK-to-Q 延迟:10ns
- 建立时间:10ns
- 保持时间:5ns
计算每个阶段的最大时钟周期
为了确保每个阶段的时序要求都得到满足,我们需要计算每个阶段的最大时钟周期。
第一阶段
- 数据路径延迟:60ns
- CLK-to-Q 延迟:10ns
- 建立时间:10ns
第一阶段的时钟周期要求: 时钟周期≥60 ns+10 ns+10 ns时钟周期≥60ns+10ns+10ns 时钟周期≥80 ns时钟周期≥80ns
第二阶段
- 数据路径延迟:45ns
- CLK-to-Q 延迟:10ns
- 建立时间:10ns
第二阶段的时钟周期要求: 时钟周期≥45 ns+10 ns+10 ns时钟周期≥45ns+10ns+10ns 时钟周期≥65 ns时钟周期≥65ns
为了确保整个流水线电路能够正确工作,时钟周期必须满足所有阶段中最严格的要求。因此,最终的时钟周期应取这两个阶段的最大值:
时钟周期=max(80 ns,65 ns)=80 ns时钟周期=max(80ns,65ns)=80ns
由于乘法延时比加法长,这两个阶段相对独立.
在流水线设计中,“气泡”(bubbles)通常指的是空闲的时钟周期,用于处理流水线中的依赖关系或避免冲突。在某些情况下,插入气泡是为了确保数据的正确性和避免数据冒险(data hazards)。然而,在这个电路中,插入一个寄存器将乘法和加法操作分成两个独立的阶段,这样可以避免大多数常见的数据冒险,因此不需要插入气泡。
为什么这个电路不需要气泡?
- 独立的流水线阶段:
- 通过在乘法器和加法器之间插入一个寄存器,将整个操作分成了两个独立的阶段。
- 每个阶段都有自己的时钟周期,数据在每个阶段的末尾被寄存器捕获并传递到下一个阶段。
- 数据流的清晰分离:
- 在第一阶段,乘法器完成乘法操作,并将结果存储在寄存器中。
- 在第二阶段,加法器从寄存器中读取乘法结果,并将其与当前状态值相加。
- 这种分离确保了每个阶段的数据都是在前一个阶段完成后的稳定状态下进行处理的,避免了数据冒险。
- 时序要求的满足:
- 每个阶段的时钟周期都足够长,以满足寄存器的时序要求(CLK-to-Q 延迟、建立时间和保持时间)。
- 例如,第一阶段的时钟周期为 80ns,第二阶段的时钟周期为 65ns,这两个值都足以确保数据在每个阶段的末尾被正确捕获和传递
07
主要介绍cache,
write-back意味着在写入命中时,数据只被写入缓存,当这个写入发生时,被写入块的脏位变为1。写入缓存的速度很快,因此回写缓存中的写入延迟通常非常小。但是,当从回写缓存中取出块时,如果脏位为1,则必须使用该块的内容更新内存,因为它包含尚未反映在内存中的更改。这使得回写缓存更难以在硬件中实现。
write-through意味着在写命中时,数据同时写入缓存和主存。写入缓存很快,但写入主存很慢;这使得透写缓存中的写延迟比回写缓存中的写延迟慢。然而,透写缓存意味着更简单的硬件,因为我们可以假设在透写缓存中,内存总是拥有最新的数据。
Write-around意味着在任何情况下,数据只被写入主存;如果缓存中有要写入的块,则块的有效位变为无效位。从本质上讲,在写绕过缓存中没有写命中这样的事情;写“命中”和写“未命中”的作用是一样的
miss policies
write -allocate的意思是,在写失败时,将丢失的块拉到缓存中。对于回写,写分配缓存,这意味着内存永远不会直接写入;相反,总是对缓存进行写操作,并且在删除时更新内存。
过程:
- 写操作:处理器尝试写入某个内存地址。
- 缓存查找:缓存控制器检查该地址是否在缓存中。
- 未命中:如果该地址不在缓存中,发生未命中。
- 加载缓存行:从主存中读取该地址所在的整个缓存行,并将其加载到缓存中。
- 写入缓存:将写操作的数据写入缓存中的相应位置。
- 写入主存:根据缓存的写策略(写回或写穿透),决定是否立即将数据写入主存
no write-allocate意味着在写失败时,不会将错过的块拉到缓存中。只更新内存
过程:
- 写操作:处理器尝试写入某个内存地址。
- 缓存查找:缓存控制器检查该地址是否在缓存中。
- 未命中:如果该地址不在缓存中,发生未命中。
- 加载缓存行:从主存中读取该地址所在的整个缓存行,并将其加载到缓存中。
- 写入缓存:将写操作的数据写入缓存中的相应位置。
- 写入主存:根据缓存的写策略(写回或写穿透),决定是否立即将数据写入主存
更新策略
LRU—最近最少使用当我们决定移除缓存块以腾出空间时,我们选择在所有块中使用时间最远的块
随机-当我们决定移除一个缓存块来腾出空间时,我们随机选择缓存中的一个块来移除。
MRU—最近使用的—当我们决定移除缓存块以腾出空间时,我们选择所有块中最近使用的块
针对下面代码,假设缓存是write through,write-allocate,也就是命中时同时写入缓存和内存,没有命中写入缓存与内存1
2
3
4
5
6
7
8
9
10int array[]; //Assume sizeof(int) == 4
for (k = 0; k < repcount; k++) { // repeat repcount times
/* Step through the selected array segment with the given step size. */
for (index = 0; index < arraysize; index += stepsize) {
if(option==0)
array[index] = 0; // Option 0: One cache access - write
else
array[index] = array[index] + 1; // Option 1: Two cache accesses - read AND write
}
}
缓存行的组织
缓存行的组织方式通常有以下几种:
- 直接映射(Direct-Mapped):
- 每个主存块只能映射到缓存中的一个特定位置。
- 简单但容易发生冲突未命中。
- 组相联(Set-Associative):
- 主存块可以映射到缓存中的多个位置(一组)。
- 平衡了直接映射和全相联的优缺点。
- 全相联(Fully Associative):
- 主存块可以映射到缓存中的任意位置。
- 复杂但灵活性高
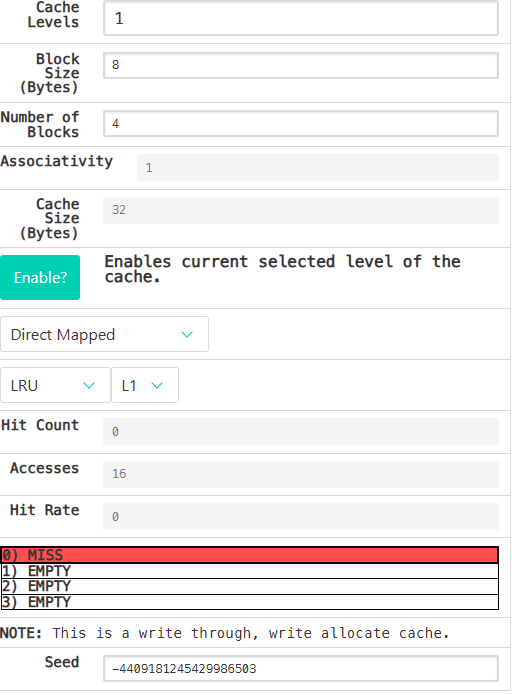
Scene 1
- Array Size (
a0): 128 (bytes) - Step Size (
a1): 8 - Rep Count (
a2): 4 - Option (
a3): 0
Cache Parameters: (set these in the Cache tab)
- Cache Levels: 1
- Block Size: 8
- Number of Blocks: 4
- Enable?: Should be green
- Placement Policy: Direct Mapped
- Associativity: 1 (Venus won’t let you change this, why?)
- Block Replacement Policy: LRU
128/8/4=4,所以一次遍历会写入4次,遍历4次就会写入16次. 发现每次都没有命中,这是为什么呢? 我们想想,每次没命中就会把对应4字节内容放入缓存和内存(write through,write-allocate),遍历一遍之后block中
cache命中的应用就是矩阵(线性代数)运算
要正确计算矩阵乘法,循环顺序并不重要。但是选择访问矩阵元素的顺序会对性能产生很大的影响。当内存访问利用空间和时间局部性,利用已经包含在缓存中的块时,缓存性能更好(缓存命中更多,缓存丢失更少)。优化程序的内存访问模式对于从内存层次结构中获得良好的性能至关重要1
2
3
4
5
6
7
8void multMat1( int n, float *A, float *B, float *C ) {
int i,j,k;
/* This is ijk loop order. */
for( i = 0; i < n; i++ )
for( j = 0; j < n; j++ )
for( k = 0; k < n; k++ )
C[i+j*n] += A[i+k*n]*B[k+j*n];
}
Cache Blocksize
1 | void transpose_blocking(int n, int blocksize, int *dst, int *src) { |
设置blocksize,一次填写一个方形块,其中每个方形块的尺寸为blocksize × blocksize。
后面几个lab就是关于页内存,SIMD,OpenMP并行编程以及Spark等等.